ComboPicker is a SwiftUI view that allows users to input a value by selecting from a predefined set or by typing a custom one.
ComboPicker is available through Swift Package Manager.
.package(url: "https://github.com/MrAsterisco/ComboPicker", from: "<see GitHub releases>")
To find out the latest version, look at the Releases tab of this repository.
ComboPicker can display any type that conforms to the ComboPickerModel protocol. The following example shows a model that wraps a Int:
public struct ExampleModel: ComboPickerModel {
  public static func ==(lhs: ExampleModel, rhs: ExampleModel) -> Bool {
    lhs.value == rhs.value
  }

  public let id = UUID()
  public let value: Int

  // Default initializer.
  public init(value: Int) {
    self.value = value
  }

  // Initializer to convert user input into a value.
  public init?(customValue: String) {
    guard let doubleValue = NumberFormatter().number(from: customValue)?.intValue else { return nil }
    self.init(value: doubleValue)
  }

  // Convert the value to prefill the manual input field.
  public var valueForManualInput: String? {
    NumberFormatter().string(from: .init(value: value))
  }
}
You also have to provide an implementation of ValueFormatterType, so that the ComboPicker knows how to
represent values in the Pickers. The following example illustrates a simple formatter for the model implemented above:
final class ExampleModelFormatter: ValueFormatterType {
  func string(from value: ExampleModel) -> String {
    "# \(NumberFormatter().string(from: .init(value: value.value)) ?? "")"
  }
}
Once you have a collection of models and the formatter implementation, building a ComboPicker is easy:
@State private var content: [ExampleModel]
@State private var selection: ExampleModel

ComboPicker(
  title: "Pick a number",
  manualTitle: "Custom...",
  valueFormatter: ExampleModelFormatter(),
  content: $content,
  value: $selection
)
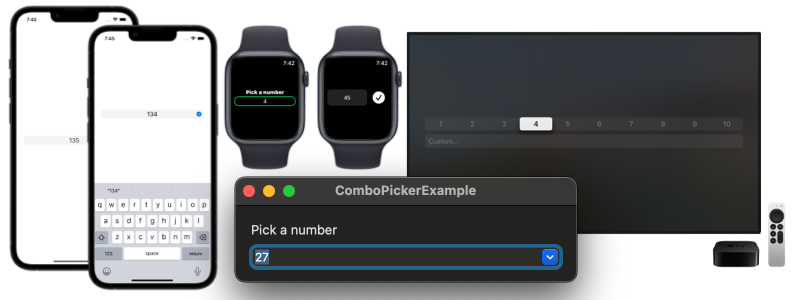
ComboPicker adapts to the platform to provide an easy and accessible experience regardless of the device.
On iOS and iPadOS, the ComboPicker shows a one-line UIPickerView that the user can scroll. If the user taps on it, a text field for manual input appears.

If necessary, you can customize the keyboard type for the manual input field:
.keyboardType(.numberPad)
Note: because of limitations of the SwiftUI Picker regarding the gestures handling, as well as the ability of showing and using multiple wheel pickers in the
same screen, ComboPicker is currently relying on a UIViewRepresentable implementation of a UIPickerView. You can read more about the current limitations here.
On watchOS, the ComboPickershows a normal Picker that the user can scroll using their fingers or the digital crown. If the user taps on it, a text field for manual input appears.
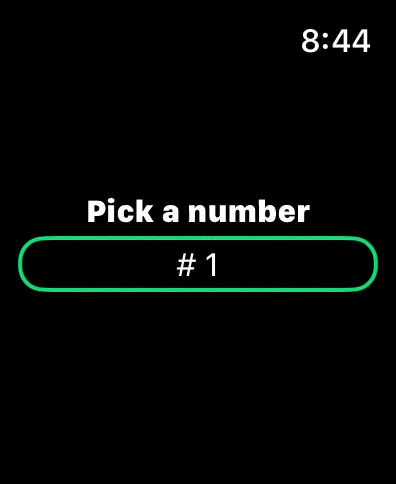
There is no support for specifying the keyboard type, at the moment, as Apple doesn’t provide a way to do so on watchOS.
On macOS, the ComboPicker becomes an NSComboBox. Users will be able to select options or type custom ones directly into the component.
See the Apple docs for further information on how combo boxes work.
On tvOS, the ComboPicker shows a Picker followed by a TextField. The user can move on the picker or scroll down to the text field and input a custom value.
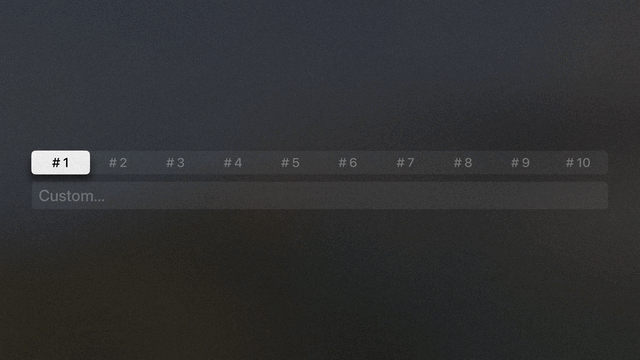
If necessary, you can customize the keyboard type for the manual input field:
.keyboardType(.numberPad)
ComboPicker requires iOS 15.0 or later, macOS 12.0 or later, watchOS 8.0 or later and tvOS 15.0 or later.
All contributions to expand the library are welcome. Fork the repo, make the changes you want, and open a Pull Request.
If you make changes to the codebase, I am not enforcing a coding style, but I may ask you to make changes based on how the rest of the library is made.
This library is under active development. Even if most of the APIs are pretty straightforward, they may change in the future; but you don’t have to worry about that, because releases will follow Semantic Versioning 2.0.0.
ComboPicker is distributed under the MIT license. See LICENSE for details.


 https://github.com/mgechev/ngrev