This library allows you to send and receive simple command messages via Bluetooth Low Energy.
Features:
Connectionless
Messages are sent as Bluetooth advertisement packets – no active connection or pairing is required.
Security
128bit AES encryption: All messages are transmitted encrypted using 128bit AES encryption.
NONCE: Each message contains a random NONCE value that increases the entropy of the encrypted message.
Rolling code: Each message is provided with a rolling code to prevent replay attacks.
One receiver – multiple senders
A receiver can (theoretically) manage up to 65,536 different remote controls and process 4,294,967,296 different or 32 simultaneous commands (the interpretation is left to the application / user).
Installation
Currently this library is neither registered with Arduino nor PlatformIO and therefore has to be installed / included manually.
Arduino IDE
Download the repository as a ZIP file.
Then select Sketch / Include Library / Add .ZIP library... in the ArduinoIDE menu and select the downloaded ZIP file.
This package exports a single dropcap function that is used to create dropped capitals. The function takes one or two positional arguments, and several optional keyword arguments for customization:
Parameter
Type
Description
Default
height
integer, length, auto
The height of the dropped capital.
2
justify
boolean, auto
Whether the text should be justified.
auto
gap
length
The space between the dropped capital and the text.
0pt
hanging-indent
length
The indent of lines after the first.
0pt
overhang
length, relative, ratio
How much the dropped capital should hang into the margin.
0pt
depth
integer, length
The space below the dropped capital.
0pt
transform
function, none
A function to be applied to the dropped capital.
none
..text-args
How to style the text of the dropped capital.
Some parameters allow values of different types for maximum flexibility:
If height is given as an integer, it is interpreted as a number of lines. If given as auto, the dropped capital will not be scaled and remain at its original size.
If overhang has a relative part, it is resolved relative to the width of the dropped capital.
If depth is given as an integer, it is interpreted as a number of lines.
The transform function takes the extracted or passed dropped capital and returns the content to be shown.
If two positional arguments are given, the first is used as the dropped capital, and the second as the text. If only one argument is given, the dropped capital is automatically extracted from the text.
Extraction
If no explicit dropped capital is passed, it is extracted automatically. For this to work, the package looks into the content making up the first paragraph and extracts the first letter of the first word. This letter is then split off from the rest of the text and used as the dropped capital. There are some special cases to consider:
If the first element of the paragraph is a box, the whole box is used as the dropped capital.
If the first element is a list or enum item, it is assumed that the literal meaning of the list or enum syntax was intended, and the number or bullet is used as the dropped capital.
Affixes, such as punctuation, super- and subscripts, quotes, and spaces will also be detected and stay with the dropped capital.
Paragraph Splitting
To wrap the text around the dropped capital, the paragraph is split into two parts: the part next to the dropped capital and the part after it. As Typst doesn’t natively support wrapping text around an element, this package splits the paragraph at word boundaries and tries to fit as much in the first part as possible. This approach comes with some limitations:
The paragraph is split at word boundaries, which makes hyphenation across the split impossible.
Some elements cannot be properly split, such as containers, lists, and context expressions.
The approach uses a greedy algorithm, which might not always find the optimal split.
If the split happens at a block element, the spacing between the two parts might be off.
To determine whether an elements fits into the first part, the position of top edge of the element is crucial. If the top edge is above the baseline of the dropped capital, the element is considered to be part of the first part. This means that elements with a large height will be part of the first part. This is done to avoid gaps between the two parts of the paragraph.
Styling
In case you wish to style the dropped capital more than what is possible with the arguments of the text function, you can use a transform function. This function takes the extracted or passed dropped capital and returns the content to be shown. The function is provided with the context of the dropped capital.
Note that when using em units, they are resolved relative to the font size of the dropped capital. When the dropped capital is scaled to fit the given height parameter, the font size is adjusted so that the bounds of the transformed content match the given height. For that, the top-edge and bottom-edge parameters of text-args are set to bounds by default.
Example
#import"@preview/droplet:0.3.1": dropcap#setpar(justify: true)
#dropcap(
height: 3,
gap: 4pt,
hanging-indent: 1em,
overhang: 8pt,
font: "Curlz MT",
)[
*Typst* is a new markup-based typesetting system that is designed to be as
_powerful_ as LaTeX while being _much easier_ to learn and use. Typst has:
- Built-in markup for the most common formatting tasks
- Flexible functions for everything else
- A tightly integrated scripting system
- Math typesetting, bibliography management, and more
- Fast compile times thanks to incremental compilation
- Friendly error messages in case something goes wrong
]
Agar bisa publish/subscribe message subject, kita harus konfigurasi:
NATS_URL = Format string, yang digunakan untuk membangun koneksi (plain TCP, TLS, or Websocket).
TLS encrypted hanya TCP connection tls://...
TLS encrypted jika di konfigurasikan atau konfigurasi plain un-encrypted TCP nats://...
Websocket ws://...
Koneksi ke cluster nats://server1:port1,nats://server2:port2
Authentikasi (opsional) jika kita butuh aplikasi kita lebih secure. NATS support multi authentikasi (username/password, decentralized JWT, Token, TLS Certificate, NKey Challange)
NATS Quality of Service (QoS)
Terdapat beberapa QoS di NATS, tergantung dari aplikasi yang kita gunakan apakah Core NATS atau menambahkan fiture JetStream (Jetstream di bangun ke dalam nats-server yang mungkin tidak dikonfigurasikan)
At most once QoS: Core NATS menawarkan at most once QoS. Jika subscriber tidak listen ke subject (no subject match), atau tidak aktif ketika message di kirim, message tidak akan diterima. Ini sama dengan level garansi TCP/IP. Core NATS adalah kirim dan lupakan messaging system. hanya akan di dalam memori dan tidak akan di simpan di disk
At Least / exaclty once QoS: Jika kamu butuh QoS dengan order tinggi (At Least & exaclty once), atau fungsi yang seperti persistent streaming, de-coupled flow control, and Key/Value Store kita bisa gunakan NATS JetStream (harus di aktifkan di dalam NATS server)
Setup NATS
Install NATS CLI Tools Di MacOS
brew tap nats-io/nats-tools
brew install nats-io/nats-tools/nats
Install NATS Server secara lokal di MacOS
brew install nats-server
Jalankan NATS Server
nats-server
# atau jika ingin mengaktifkan fitur monitoring HTTP
nats-server -m 8222
Buka di Web browser kita 0.0.0.0:8222 dan NATS Server aktif di port 4222
NATS CLI
# Help NATS CLI
nats -h

# Cheat sheet untuk NATS
nats cheat
# Cheat sheet berdasarkan sections
nats cheat --sections
# Contoh
nats cheat pub

nats account info

nast bench test --pub 10

nats  bench test --pub 10 --msgs 1000000
Subject berbasis messaging
Dasarnya, NATS itu mempublish dan listening sebuah message, Keduanya bergantung kepada subject yang ada.
Apa itu subject
Sederhananya, subject hanyalah string dari nama character yang mana digunakan publisher dan subscriber untuk berkomunikasi, Jadi message akan berkomunikasi melalui subject.
Character yang di izinkan untuk penamaan subject
a to z, a to Z (Case Sensitive, tidak boleh ada spasi)
Spesial Karakter: . digunakan sebagai pemisah dalam subject dan *, > sebagai wildcards
Wildcard bisa digunakan untuk menggantikan . (pemisah subject)
Subscriber bisa menggunakan wildcard untuk listen ke multiple subject dengan single subscription.
Publisher tidak bisa menggunakan wildcards
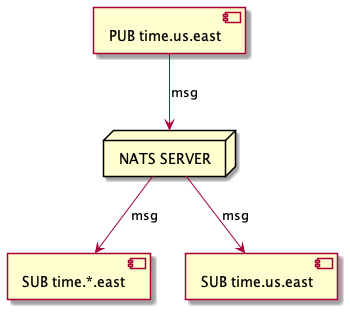
Single Token (*)
Pada contoh diatas subscriber ini akan mendapatkan msgSUB time.*.east dari subject yang berformat antara time dan east (hanya satu format token saja)
misal:
# Di terima karena token (us) single
time.us.east
time.en.east

# Tidak di terima karena token (us.en) multi
time.us.en.east
Multiple Token (>)
Pada contoh diatas > hanya bisa di aplikasikan di akhir subject saja, misal SUB time.us.>.
Sebagai contoh time.us.> akan cocok dengan time.us.east dan time.us.east.atlanta, sementara time.us.* hanya akan cocok dengan time.us.east karena * tidak bisa mencocokkan lebih dari satu token.
Mixing Wildcard
* dapat digunakan beberapa kali di subject, sedangkan > hanya di akhir saja, misal: *.*.east.> akan bisa menerima time.us.east.atlanta
Rekomendasi Subject Token
Di rekomendasikan agar tetap menjaga jumlah token yang masuk akal, maksimal 16 token
NATS Core
NATS Core adalah kumpulan fungsi dasar dan quality service yang di offer oleh NATS service infrastructure. Dimana tidak ada nats-server yang di konfigurasi untuk mengaktifkan JetStream.
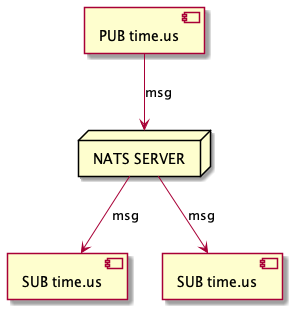
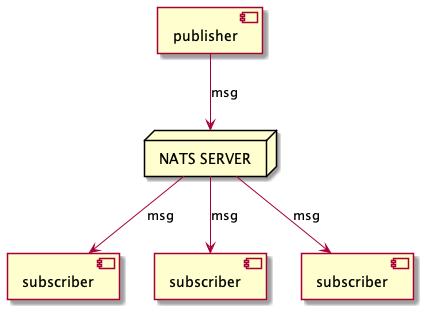
Fungsi dasar NATS Core adalah publish/subscribe, subject-based-addressing dan queuing dengan QoS at most once
Publish Subscribe
NATS Mengimplementasi distribusi message publish-subscribe dengan model 1:M one to many communication. Publisher akan mengirim message ke subject dan akan di terima oleh subscriber yang aktif me-listen ke subject tersebut. Pola 1:M biasa disebut fan-out
Message
Message terdiri dari
Subject
payload dalam bentuk byte array
number di field headers
opsional reply di field address
Message mempunyai ukuran maksimal (yang mana di konfigurasi di max_payload).
Ukuran default nya 1MB, tapi bisa di perbesar sampai dengan 64MB. Rekomendasinya maksimal 8MB
Latihan
Dalam hal ini akan menggunakan nats client untuk berkomunikasi dengan nats-server
Membuat subscriber dengan format nats sub <subject>
nats sub msg.zul
Membuat publisher dengan format nats pub <subject> <message>
nats pub msg.zul "Hallo Bro"
Membuat subscriber dengan format wildcard single token
# Terminal 1
nats sub "msg.*"# Terminal 2
nats sub "msg.>"# Terminal 3
nats pub msg.zul "Hallo Zul"
nats pub msg.rif "Hallo Rif"
nats pub msg.test.yog "Hallo Yog"#Tidak akan di terima oleh msg.* diterima oleh msg.>
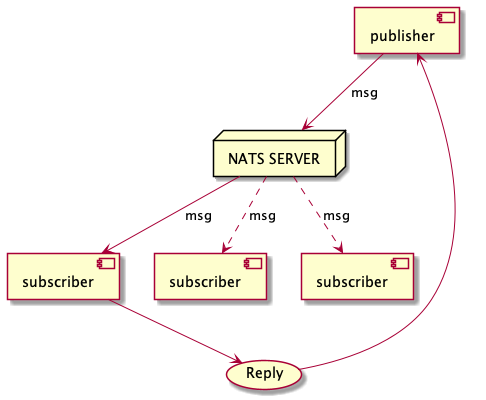
Request-Reply
Request-Reply adalah pola yang umum di modern distribution systems. Sebuah request di kirim, dan aplikasi menunggu response dengan waktu tertentu atau menerima secara asynchronous
NATS support Request-reply menggunakan mekanisme komunikasi inti – publish dan subscribe. Responder akan listen ke subject dan ketika ada Requester yang request, maka responder akan langsung meresponse ke reply subject. Reply subject disebut inbox.
Beberapa responder NATS dapat membentuk queue grup yang dynamic. Jadi tidak perlu secara manual add atau remove subscriber dari group untuk memulai dan berhenti mendistribusikan message, karena akan otomatis. Jadi kita bisa men scale up/down sesuai demand.
Karena NATS pada dasarnya publish-subscribe. Untuk observasi simple kita bisa melihat request dan response untuk mengukur latency.
Kelebihan NATS bahkan memperbolehkan multiple response.
Latihan
Membuat Reply Client Listener (Responder), yang akan menunggu request yang masuk, akan mengirim response ke Requester
nats reply help.please 'OK, I CAN HELP!!!'
Membuat Request Client (Requester), yang akan menerima response dari Responder
nats request help.please 'I need help!'
Queue Group
Ketika subscriber me-register diri mereka sendiri untuk menerima message. Pola messaging 1:M fan out harus memastikan bahwa message yang di kirim oleh publisher, harus tersampaikan ke semua subscriber yang sudah ter-register. Terdapat fitur Queue yang bisa me-register subscriber untuk bagian dari queue disebut queue groups.
Rule penamaan queue disamakan dengan penamaan subject
nats request menyapa --count 10 "Hai aku Doni {{Count}}"
Keuntungan
Memastikan toleransi kesalahan pada aplikasi Fault Tolerant
Pemprosessan beban dapat di scale up atau down
Tidak perlu tambahan konfigurasi
Queue group di definisikan oleh aplikasi client bukan oleh konfigurasi server
Stream sebagai Queue
JetStream stream juga bisa digunakan sebagai queue dengan men setting retention policy di WorkQueuePolicy dan memanfaatkan pull consumers untuk memudahkan mendapat horizontal scalability
Queue Geo Affinity
Ketika kita memiliki NATS Super Cluster yang terhubung secara global, terdapat automatic service geo-affinity yang bisa meneruskan request message ke cluster region lain, jika cluster region target tidak tersedia
JetStream
NATS memiliki distributed persistence system yang di panggil JetStream, yang memiliki fitur baru dan memiliki QoS yang berorder tinggi diatas Core NATS.
JetStream terintegrasi di nats-server dan hanya butuh 1 (2 atau 5 jika ingin memiliki fault tolerance terhadap 1 atau 2 kegagalan server secara bersamaan) NATS Server agar JetStream diaktifkan untuk semua aplikasi client yang kita miliki.
JetStream dibuat untuk menyelesaikan masalah yang di identifikasi dengan streaming technology saat ini, yakni kompleksitas complexity, kelemahan fragility, kuranf nya skalabilitas lack scalability.
# Jalankang server JetStream
nats-server -js -m 8222
# Check JetStream
nats account info
# Membuat Stream
nats stream add stream_saya
#Info
nats stream info stream_saya
# Publish message ke stream
nats pub test --count=1000 --sleep 1s "publication #{{Count}} @ {{TimeStamp}}"# Watch consumer
nats consumer next stream_saya pull_consumer --count 1000
Tujuan JetStream di kembangkan
System harus mudah di konfigurasi, dan di operasikan dan di amati.
System harus aman dan beroperasi dengan baik dengan NATS 2.0 security model.
System harus di scale horizontal dan berlaku untuk tingkat konsumsi yang tinggi.
System harus support multi use case.
System harus self heal dan selalu available.
System harus mempunyai API yang dekat dengan Code NATS.
System harus mengizinkan message NATS menjadi bagian stream yang dinginkan.
System harus manampilkan perilaku diagnostik payload.
System harus tidak mempunyai 3rd party aplikasi
Fungsi yang diaktifkan oleh JetStream
Temporal decoupling antara publisher dan subscriber
Salah satu prinsip dasar publish/subscribe dibutuhkan coupling sementara antara publisher dan subscriber:
Subscriber hanya menerima message yang di publish ketika subscriber ini terhubung dengan Messaging System yaitu subscriber ini tidak akan menerima message yang di publish jika subscriber ini tidak aktif atau terputus dari messaging system.
Cara Tradisionalnya untuk Messaging System akan menyediakan temporal decoupling dari publisher dan subscriber melalui durable subscriber atau melalui Queue, namun tidak ada yang sempurna cara ini.
Durable Subscriber perlu di buat sebelum message di buat.
Queue maksudnya adalah distribusi beban kerja dan konsumsi, untuk tidak digunakan di mekanisme request - reply
Bagaimanapun temporal decoupling ini sudah mainstream.
Stream menangkap dan menyimpan message yang di publish pada 1 atau lebih subject dan mengizinkan client membuat subscriber (JetStream Consumer) yang bisa kapan saja di consume semuanya atau hanya beberapa message saja yang di simpan di Stream.
Reply policies
JetStream support beberapa replay policies, tergantung pada aplikasi consumer yang akan menerimanya:
Semua message saat ini di simpan di stream, maksudnya reply yang sudah complete. Kita dapat memilih reply policy yaitu (kecepatan replaynya) menjadi:
Instant, maksudnya message akan di kirim ke consumer secepat yang dia bisa ambil.
Original, maksudnya message akan di kirim ke consumer pada rate mereka mempublishnya ke stream, sangat berguna untuk contoh staging production server
Message yang terakhir yang di simpan di stream, atau message yang terakhir untuk tiap – tiap subject (stream dapat mengambil lebih dari 1 subject)
Di mulai dari spesifik sequence number
Di mulai dari spesifik waktu start
Retention Policies dan Limits
Stream tidak akan selalu terus berkembang selamanya (bertambah banyak) dan jetstream support multiple retention policy yang mana kemampuan untuk menentukan ukuran limit pada stream.
Limits
Kita bisa limit beberapa pada stream:
Max umur message
Max total stream (bytes)
Max jumlah message di stream
Max individual ukuran message
Discard Policy: Ketika limit tercapai, message baru di publish ke stream, kamu dapat memilih untuk membuang message yang terbaru atau sudah lama untuk memberi ruang untuk message yang baru.
Discard Old stream akan otomatis membuang message yang terbaru atau sudah lama untuk memberi ruang untuk message yang baru.
Discard New message yang masuk akan di tolak, dan JetStream akan mempublish return error yang menandakan limit telah tercapai
limit jumlah consumer yang dapat di define untuk stream pada titik waktu tertentu
Retention Policies (Kebijakan Penyimpanan)
limits (default)
interest (message akan di simpan di stream selama ada consumer yang menerima message)
work queue (stream digunakan sebagai shared queue dan message akan di hapus setelah ada yang mengambil nya)
Persistent Distributed Storage
Kita bisa memilih durability juga ketahanan penyimpanan pesan sesuai kebutuhan.
Penyimpan Memori
Penyimpanan File
Replication (1 (none), 2, 3) antara nats server untuk fault tolerant
Stream Replication Factor
Stream Replication Factor (R, sering mengacu pada jumlah Replicas) yang menentukan berapa banyak tempat itu di simpan, yang memungkinkan agar menyesuaikan resiko terhadap penggunaan daya dan kinerja. Stream mudah di bangun kembali atau mungkin sementara base memori R=1 dan stream dapat mentoleransi beberapa downtime yang ada di base R=1
Replicas=1 tidak bisa beroperasi selama pemadaman server yang sedang melayani stream, Performace tinggi
Replicas=2 tidak ada keuntungan yang signifikan, di rekomendasikan replicas 3
Replicas=3 Dapat mentoleransi jika ada 1 server yang mati. Ideal balance antara resiko dan performance
Replicas=4 tidak ada keuntungan yang signifikan di bandingkan R=3
Replicas=5 Dapat mentoleransi 2 server yang melayani stream yang mati secara bersamaan. Mengurangi resiko dan mengorbankan performance
Mirroring Beetwen Streams
Jetstream juga bisa memudahkan administrator me-mirrorkan stream. Sebagai contoh domain jetstream yang berbeda untuk dijadikan disaster recovery. Kita juga bisa definisikan salah satu stream sebagai submber untuk lainnya.
De-coupled flow control
JetStream menyediakan de-coupled flow pada stream, flow control bukanlah end to end dimana publisher terbatas untuk publish tidak cepat dari semua consumers yang paling lambat dapat menerima, tapi terjadi secara individual antara aplikasi client (publishers atau consumers) dan nats-server.
Ketika menggunakan JetStream, Jetstream publish call untuk mempublish ke stream yang terdapat mekanisme acknowledgement anatara publisher dan nats-server, kita yang menentukan apakah async atau sync (batch) Jetstream publish call.
Pada sisi subscriber mengirim message dari nats server ke client aplikasi atau consume message dari stream juga di kontrol alirannya.
Exactly once message delivery
Karena publish ke stream menggunakan JetStream publish calls di acknowledge oleh server, QoS yang akan di jamin oleh stream at least once, artinya meski dapat di andalkan dan bebas dari duplikasi
ada beberapa skenario kegagalan tertentu, yang dapat membuat aplikasi publisher (salah) mengira bahwa message tidak berhasil di publish maka di publish lagi,
ada skenario kegagalan yang dapat menghasilkan aplikasi client meng consume acknowledgement yang hilang, dan karena itu message di kirim ulang oleh server ke consumer.
Skenario kegagalan tersebut meskipun jarang terjadi tetapi memang ada dan dapat mengakibatkan duplicate message pada level aplikasi
Consumers
JetStream consumer adalah tampilan pada stream, mereka ini mensubscribe atau di pull oleh aplikasi client untuk memperoleh copy an (atau consume jika stream di set sebagai work queue) message yang di simpan di stream.
Fast push consumers
Aplikasi Client dapat memilih untuk menggunakan fast un-acknowledged push (ordered) consumers untuk menerima message secepat mungkin
Horizontally scalable pull consumers with batching
Aplikasi client juga bisa menggunakan dan share pull consumer berdasarkan demand, support batch. Pull Consumers bisa dan dimaksudkan antar aplikasi (seperti group queue) dalam memberikan kemudahan dan transparansi horizontal scale pada pemprosessan dan konsumsi message dalam stream tanpa mempunyai sebagai contoh khawatir karena harus mendefinisikan partisi, atau khawatir tentang fault tolerant.
Catatan: Menggunakan pull consumer bukan berarti kamu tidak akan mendapatkan update dari pesan baru yang di publish ke stream pushed secara realtime di aplikasi kamu, karena kamu dapat memberikan timeout ke consumer fetch call dan loop.
Consumer acknowledgements
Beberapa consumer support acknowledged semua message sampai dengan jumlah sequence yang di terima, beberapa consumer menyediakan QoS yang tinggi tetapi membutuhkan acknowledge penerimaan dan pemprosesan setiap pesan secara explisit serta jumlah waktu maksimal server akan menunggu acknowledgement untuk spesifik message sebelum di kirim (ke proses lain yang di lampirkan ke consumer).
Bisa mengirim balik negative acknowledgements
Bahkan bisa mengirim progress acknowledgements
Key Value Store
JetStream merupakan persistance layer, dan streaming hanya salah satu dari fungsional yang di bangun di atas layer itu.
Fungsi lainnya (umumnya tidak ada dalam messaging system) adalah JetStream Key Value Store: kemampuan untuk menyimpan, mengambil, delete value message yang terasosiasi dengan key, untuk watch (listen) perubahan yang terjadi pada key tersebut, dan bahkan untuk mengambil history (nilai yang ada dan yang di hapus) pada key tertentu
Object Store
Object Store sama dengan key value store, tetapi di design dengan penyimpanan yang lebih besar objects (contoh file, atau yang bisa lebih besar lagi) by default 1 MB
Stream
Stream adalah message stores, tiap stream mendefinisikan bagaimana message di simpan seperti limit (durasi, size, interest) atau retention rate. Stream consume normal NATS Subject, tiap message yang di publish ke subject tersebut akan di simpan di sistem storage, Kita bisa kirim message dengan unknowledge delivery, meskipun menggunakan Jetstream publish call lebih bagus karna Jetstream server akan reply dengan acknowled (mengirim balik), untuk memastikan bahwa message berhasil di simpan.
Gambar di atas bagaimana stream menyimpan semua message dari ORDERS.*
Streams dapat consume banyak subject. Di sini ada ORDERS.*, bahkan kita juga bisa consume dengan subject SHIPPING.*, tetapi di gambar tersebut hanya menunjukan contoh order.
Stream support berbagai retention policies, berikut list nya
Item
Description
Name
Penamaan Stream tidak menggunakan spasi, tabs, period., lebih besar>, asterisk*
Storage
Tipe penyimpanan, File atau Memori
Subjects
List subjects untuk di consume
Replicas
Berapa banyak replicas untuk menyimpan setiap message di cluster JetStream, max 5
MaxAge
Max umur message di stream (ns)
MaxBytes
Berapa banyak bytes yang mungkin disimpan di stream, jika sudah melebihi size akan menghapus message lama atau me-reject message baru
MaxMsgs
Berapa banyak jumlah message yang mungkin di simpan di stream, jika sudah melebihi jumlah message yang di tentukan akan menghapus message lama atau me-reject message baru
MaxMsgSize
Ukuran terbesar message yang di perbolehkan oleh stream
MaxConsumers
Berapa banyak consumer yang dapat di define di stream, default -1 (unlimited)
NoAck
menonaktifkan acknowledge, jika message sudah di terima oleh stream (tidak mendapat respon success)
Retention
Bagaimana retention di consider LimitsPolicy(default), InterestPolicy, WorkQueuePolicy
Discard
Ketika stream mencapai limit DiscardNew akan menolak message baru, DiscardOld menghapus message lama
Duplicates
untuk melacak message yang duplikat dalam (ns)
Consumers
Consumers dapat dipahami sebagai views di stream, Consumers mengkonsumsi message dari semua atau subset message yang di simpan di stream, sesuai dengan subject filter dan replay policy dan dapat digunakan oleh 1 aplikasi atau lebih. tidak apa-apa untuk membuat banyak consumers menunjuk pada stream yang sama.
Consumers bisa push atau pull. Dimana push JetStream akan mengirim message secepat mungkin (sambil mematuhi rate limit policy) untuk subject yang kita pilih. Sedangkan pull mempunyai kontrol untuk menanyakan server untuk message. Pilihan ini tergantung use case tetapi typical nya aplikasi client butuh mendapatkan replay message dari stream kita gunakan push. Sedangkan use case scalling horizontal pemprosessan message dari stream gunakan pull.
Berikut configurasi consumer
Item
Description
AckPolicy
Bagaimana message harus di acknowledge, Jika ack wajib lalu tidak menerima message, (dengan konfigurasi AckWait) message akan dikirim ulang. – AckExplicit (default) tiap individual message harus di acknowledge. – AckNone tidak perlu men ack message apapun, server akan mengasumsi bahwa ack saat delivery. – AckAll Jika kita menerima serangkaian message maka hanya perlu menandai message yang terakhir di terima saja. Otomatis message sebelumnya statusnya menjadi ack.
AckWait
Menunggu ack dalam (ns) bahwa server akan menunggu ack di tiap – tiap individual message setelah dikirim ke consumers. Jika ack tidak di terima, maka message akan dikirim ulang.
DeliveryPolicy/ OptStartSec/ OptStartTimer
Ketika consumer pertama kali dibuat, kita bisa menentukan spesifikasi di stream dimana kita ingin memulai menerima messages dengan DeliveryPolicy. – DeliverAll(Default) Consumer akan menerima message dari awal message diterima. – DeliverLast Ketika pertama kali consume message. Consumer akan memulai menerima message dengan message yang terakhir di terima stream. – DeliverLastSubject Ketika pertama kali consume message, dimulai dengan yang terbaru untuk setiap subject yang di filter saat ini. – DeliverNew Ketika pertama kali consume message, consumer hanya akan memulai menerima message yang sudah dibuat setelah consumer dibuat. . – DeliverByStartSequence Ketika pertama kali menerima message, dimulai dari set message tertentu, consumer harus menentukan OptStartSeq, urutan sequence tertentu untuk consumer mulai consume. – DeliverByStartTime Ketika pertama kali consume message, message mulai diterima pada atau setelah waktu ini.
DeliverySubject
Subject untuk men-observasi message yang dikirim. Dengan ini membuat push consumer dan pull consumer tidak perlu delivery subject yang static. Jika kita ingin mendistribusi message antara subscriber ke consumer maka kita perlu men spesifikasi nama qeueu group.
Durable (Nama)
Nama dari consumer, server yang mana yang akan melacak, mengizinkan melanjutkan consume di tempat yang ditinggalkan. Secara default consumer bersifat sementara, untuk membuat tahan lama (durable), maka set nama nya.
FilterSubject
Ketika consume dari subject wildcard, kita dapat memilih himpunan bagian saja dari full wildcard untuk menerima message.
MaxAckPending
Mengimplementasikan bentuk sederhana 1:M flow control. Men set jumlah max message tanpa acknowledgement, ketika limit tercapai delivey message akan di suspend. Kita tidak bisa menggunakan AckNonePolicy. -1 = unlimited.
MaxDeliver
Maximum frekuensi message yang akan diterima, berulaku untuk ack.
RateLimit
Digunakan untuk membatasi pengiriman message ke consumer. Dalam bit/s.
ReplayPolicy
Ini hanya akan di aplikasikan jika DeliverAll, DeliverByStartSequence or DeliverByStartTime. Karena membaca message bukan dari akhir Jika ReplayOriginal message dalam stream akan di push ke client pada rate yang sama. Jika ReplayInstant (default), message akan dikirim secepat mungkin, ketika mematuhi AckPolicy, MaxAckPending, dan cliet yang mempunyai kemampuan consume message itu.
SampleFrequency
Set persentasi acknowledgement yang harus di ambil samplenya untuk observasi, dari 0 – 100 dalam string, contoh nilai yang valid 30 dan 30%.
Latihan
Banyak relasi subject yang disimpan di stream.
Consumer bisa memiliki mode operasi yang berbeda, dan hanya menerima beberapa bagian message.
Beberapa Acknowledgement mode support.
Order masuk di ORDERS.received di kirim ke Consumer NEW yang jika berhasil akan membuat message baru di ORDERS.processed.
Ketika message masuk di ORDERS.processed maka Consumer DISPATCH akan menerimanya dan setelah selesai di proses akan membuat ORDERS.completed yang akan di simpan di stream.
Operasi – operasi ini adalah pull yang artinya mereka adalah work queue dan dapat di scale horizontal. Semuanya butuh acknowledgement untuk memastikan tidak ada orders yang hilang atau missing.
Semua message akan di deliver ke Consumer MONITOR tanpa ada acknowledgement menggunakan Pub/Sub semantik, mereka di push ke monitor.
Saat message di acknowledgement di NEW dan DISPATCH Consumer. Percentage mereka adalah sample dan message yang menunjukan jumlah pegiriman ulang, ack delay, dll. Di kirim ke sistem monitoring.
# Check help Stream
nats stream --help

# Membuat Stream
nats stream add ORDERS --subjects "ORDERS.*" --ack --max-msgs=-1 --max-bytes=-1 --max-age=-1 --storage file --retention limits --max-msg-size=-1 --discard=old

# Print list semua Stream
nats stream ls

# Print info Stream ORDERS
nats stream info ORDERS

# kosongkan message yang ada di stream
nats stream purge

# hapus stream
nats stream rm
Membuat Consumer
# Check help consumer
nats consumer --help

# Membuat Consumer NEW
nats consumer add ORDERS NEW --filter ORDERS.received --ack explicit --pull --deliver all --max-deliver=-1 --sample 100

nats consumer add ORDERS DISPATCH --filter ORDERS.processed --ack explicit --pull --deliver all --max-deliver=-1 --sample 100

nats consumer add ORDERS MONITOR --filter '' --ack none --target monitor.ORDERS --deliver last --replay instant

# Print semua consumer
nats consumer ls
nats consumer ls -a ORDERS

#Print info consumer
nats consumer info -a ORDERS NEW
Key/Value Store
Jetstream mempunyai fitur penyimpanan key/value, yang mana client dapat membuat bucket.
Kita bisa gunakan beberapa KV bucket dalam beberapa operasi
put: Mengaitkan nilai dengan key
get: Mengambil nilai dari key
delete: hapus nilai yang terkait dengan key
purge: hapus semua nilai yang terkait dengan semua key
create: Mengaitkan nilai dengan key jika mendefine nilai
update: compare & set (membandingkan dan menukar) nilai pada key
keys: ambil copy semua kunci (dengan nilai dan yang terkait)
Kita bisa set limit pada bucket
Max ukuran bucket
Max ukuran tiap satu nilai
TTL: Berapa lama nilai yang akan disimpan
Terakhir
watch: amati perubahan yang terjadi pada key
watch all: amati semua perubahan yang terjadi pada semua key di bucket
history: Ambil history dari nilai
Latihan
# print list bucket
nats kv ls
# Bikin bucket kv
nats kv add bucket_saya
# Bikin key value pada bucket
nats kv put bucket_saya key1 "hai zul"# Ambil nilai key dari bucket
nats kv get bucket_saya key1
# Hapus key dari bucket
nats kv del bucket_saya key1
# Amati perubahan pada bucket
nats kv watch bucket_saya
nats kv put bucket_saya Key1 Value2
# Hapus bucket
nats kv rm bucket_saya
Object Store
Object Store hampir sama dengan Key Value, perbedaannya adalah pada ukuran nilai (value) pada key value store hanya 1 MB (default). Sedangkan pada Object Store bisa ukuran apa saja, Object Store mengimplementasi potongan (chunking) mekanisme, bisa mengambil dan menyimpan files
Latihan
# Bikin file uji
touch test.txt
echo'File Percobaan' test.txt
cat test.txt
# Print list object bucket
nats object ls
# Bikin object bucket
nats object add bucket_file
# Simpan file di bucket
nats object put bucket_file ./test.txt
# Print isi semua dari bucket
nats object ls bucket_file
# Ambil file dari bucket
nats object get bucket_file test.txt
# Hapus file dari bucket
nats object rm bucket_file test.txt
# Print informasi tentang bucket
nats object info bucket_file
# Amati perubahan bucket
nats object watch bucket_file
# Segel bucket
nats object seal bucket file
# Hapus bucket
nats object rm bucket_file
nats sub --user=a --password=b -s nats://localhost:4222 ">"
Catatan: Kita tidak bisa menggunakan metode token dan user/pass bersamaan
Authorization
NATS Support Authorization menggunakan subject level permission pada per user. Authorization ini tersedia pada multi level authentication via users list.
Setiap permission menentukan user apakah dapat publish atau subscribe. Untuk complex configuration, kita dapat menspesifikasikan permission object yang secara explicit mengizinkan atau melarang subject.
Spesial di dalam authorization map adalah default_permissions. Ketika di define maka permission akan diaplikasikan ke seluruh user yang tidak punya authorization.
Permission Configuration Map
map permission menspesifikasikan subject yang dapat di subscribe dan di publish ke client tertentu.
Property
Description
publish
subject, list subject yang dapat di publish oleh client.
subscribe
subject, list subject yang dapat di subscribe oleh client. Dalam context ini memungkinkan memberikan nama queue (opsional): <subject> <queueu> untuk mendefinisikan queue group permission. Permission ini juga bisa menggunakan wildcard .* dan .>
# Client harusnya tidak bisa subscribe pada seluruh subject, ada violation
nats sub --user=client --password=client123 -s nats://localhost:4222 ">"# Client dapat subscribe ke "_INBOX.>"
nats sub --user=client --password=client123 -s nats://localhost:4222 "_INBOX.>"# Other tidak bisa subscriber ke ">"
nats sub --user=other --password=other123 -s nats://localhost:4222 ">"# Other tidak assign ke permissions mana pun yang artinya dia akan di binding ke default_permissions
nats sub --user=other --password=other123 -s nats://localhost:4222 "PUBLIC.>"
Permission Map
Permission map mengizinkan kita secara list explisit untuk allow dan deny, kita bisa deklarasi keduanya sekaligus, jika kita mendefinisikannya secara tumpang tindih maka deny akan lebih di prioritaskan.
Property
Description
allow
list nama subject yang di izinkan untuk client yang diassign
deny
list nama subject yang akan di tolak untuk client yang di assign
# Other tidak bisa sub ke >
nats sub --user=other --password=other123 -s nats://localhost:4222 ">"# Other bisa subscribe ke client.>
nats sub --user=other --password=other123 -s nats://localhost:4222 "client.>"# Other tidak akan bisa publish
nats pub test --user=other --password=other123 -s nats://localhost:4222 "haii"
Allow Response Map
allow_responses memungkinkan kita mengkonfigurasi jumlah maksimum response dan berapa lama permission nya valid. Ketika di set true, hanya satu response yang di izinkan (default).
Property
Description
max
Maksimal jumlah response message yang dapat di publish
expires
Jumlah waktu permission yang valid, 1s, 1m, 1h. Default nya tidak mempunyai limit time.
# User a hanya bisa subscribe ke test subject dan "queue" sebagai nama queuenya
nats sub test --queue queue --user=a --password=a -s nats://localhost:4222

# User a tidak bisa subscribe ke subject test2
nats sub test2 --queue queue --user=a --password=a -s nats://localhost:4222
# User a tidak bisa subscribe ke queue queue2
nats sub test --queue queue2 --user=a --password=a -s nats://localhost:4222
# User a tidak bisa subscribe ke subject test tanpa queue
nats sub test --user=a --password=a -s nats://localhost:4222
Reloading a Configuration
Jika kita ingin menghapus / menambah konfigurasi, dan kita ingin mengimplementasi perubahan untuk reload tanpa restart server dan disconnect client maka kita gunakan
ForgeFed is an ActivityPub-based federation protocol for software forges. You
can read more about ForgeFed and the protocol specification on our
website.
Contributing
There’s a huge variety of tasks to do! Come talk with us on the forum or
chat. More eyes going over the spec are always welcome! And feel free to
open an issue if you notice missing details or unclear text or have improvement
suggestions or requests.
However, to maintain a manageable working environment, we do reserve the issue
tracker for practical, actionable work items. If you want to talk first to
achieve more clarity, we prefer you write to us on the forum or chat, and
opening an issue may come later.
If you wish to join the work on the ForgeFed specification, here are some
technical but important details:
We don’t push commits to the main branch, we always open a pull request
Pull requests making changes to the specification content must have at least
2 reviews and then they wait for a cooldown period of 2 weeks during which
more people can provide feedback, raise challenges and conflicts, improve the
proposed changes etc.
If you wish to continuously participate in shaping the specification, it
would be useful to go over the open PRs once a week or so, to make sure you
have a chance to communicate your needs, ideas and thoughts before changes
get merged into the spec
Important files in this repo to know about:
The file resources.md lists which team members have access to which project
resources, openness and transparency are important to us!
The actual specification source texts are in the spec/ directory
Simple typescript project that acts as steam guard authenticator and extracts important information.
This app was mainly designed to extract auth secret from steam so it can be used by Bitwarden TOTP,
however it can also be used as temoprary steam authenticator (only for one session). This app does not preserve state when closed,
so make sure you save all output produced from running this tool!.
Open a terminal and execute the following commands:
npm install -g typescript
npm install -g ts-node
git clone https://github.com/ULTUX/steam-guard-creds-extractor.git
cd steam-guard-creds-extractor
npm i
To run the app:
ts-node-esm src/index.ts
The app will ask you for your steam [account name], [password] and the [secret code] received in the telephone (SMS).
√ What's your steam account name? ... [account name]
√ What's your steam account password? ... [password]
Secret received from Steam: [this is what you are looking for]
√ Provide SMS code you received. ... 43237
Succesfully added steam guard to your account.
Your revocation code is: [revocation code]
Your shared secret: [this is what you are looking for]
Your auth secret (for bitwarden TOTP): [secret code for bitwarden (optional)]
Auth secret copied to clipboard!
Steam activation code: 8N826
Steam activation code: 8N826
Steam activation code: XF83D
...
Press CTRL+C to stop and save all this data but Steam activation codes. A new Steam guard has been added to your account with the given shared secret. You will need the revocation code to remove it from your account in the future.
If you need to sign in later you can use the shared secret code to generate Steam guard codes, as the Steam mobile app does. Just execute the following command, passing as argument your shared secret code.
HVMC is a more-strongly design pattern based on MVC (Model-View-Controller). You got many advantages by using this pattern, especially if your project is very big.
Key advantages (M.O.R.E):
Modularization: Reduction of dependencies between the disparate parts of the application.
Organization: Having a folder for each of the relevant triads makes for a lighter work load.
Reusability: By nature of the design it is easy to reuse nearly every piece of code.
Extendibility: Makes the application more extensible without sacrificing ease of maintenance.
This project uses ROS2 (Humble) to perform Autonomous Simultaneous Localization and Mapping (A-SLAM) using
a Spot robot from Boston Dynamics.
The project was named Rustbuster due to the fact that it was initially intended to perform corrosion inspection, in an offshore platform.
System Hardware
Spot robot
RealSense Intel D455 (RGB-D and IMU)
Laptop
Ethernet cable (optional)
The intel d455 is used instead of spot’s, native cameras because it has a higher frame rate and IMU. NOTE: It is possible to calculate Spot’s IMU using the odometry messages, but the method is slow and imprecise.
Installation
This system was developed and tested only in a Lenovo IdeaPad Gaming 3 15ARH05 laptop running Ubuntu 22.04.
The configuration files are saved in the config folder. spot_launch
contains lots of if statements, to deactivate parts of the program, for debugging.
Contributing
If you would like to contribute, please feel free to open a PR.
I am not maintaining the project anymore because I don’t have access to a spot, to test the changes.
License
RustBuster is an open-source software. So just use it as you please 😄
Supervisor is a Docker GitOps service that allows you to manage docker-compose based stacks through a REST API. The minimal input required to manage stacks includes a unique name, a URL to the git repository hosting the stack files, and a strategy for updating the stack (either via polling or webhook). Authentication and authorization are handled via HTTP headers.
To retrieve Prometheus metrics, you can access the
http://supervisor.example.com:9394/metrics endpoint.
supervisor_total_stacks: The total number of stacks. (gauge)
supervisor_total_healthy_stacks: The total number of healthy stacks. (gauge)
supervisor_total_unhealthy_stacks: The total number of unhealthy stacks. (gauge)
supervisor_jobs_execution_time: The time taken to execute stack jobs, measured in seconds. (histogram)
supervisor_jobs_executed_total: The total number of stack jobs executed. (counter)
supervisor_jobs_succeeded_total: The total number of stack jobs that succeeded. (counter)
supervisor_jobs_failed_total: The total number of stack jobs that failed. (counter)
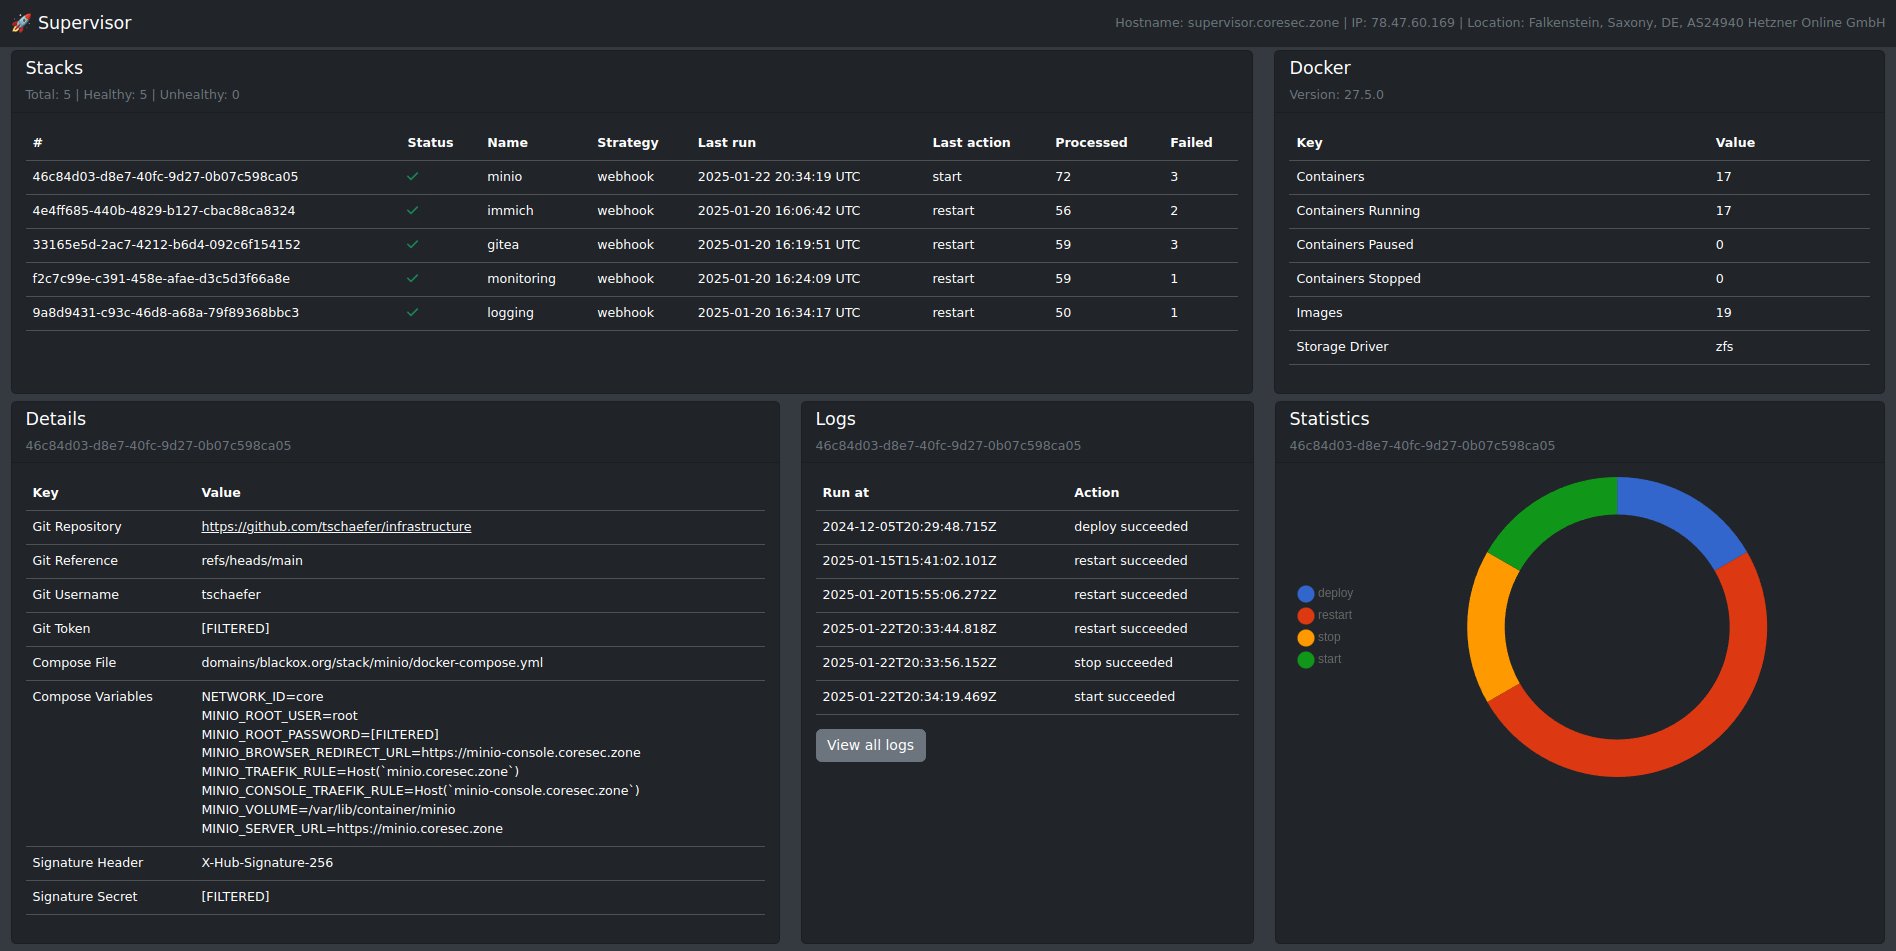
Dashboard
Supervisor provides a simple dashboard to view and monitor stacks. The
dashboard is accessible at the URL path /dashboard of the Supervisor service.
The access is restricted by basic authentication. The credentials are set
via the environment variables SUPERVISOR_DASHBOARD_USERNAME and
SUPERVISOR_DASHBOARD_PASSWORD. The default credentials username is
supervisor and the password is supervisor as well.


 https://github.com/sivar2311/ESP32-BLE-RemoteControl